关于 java.io.PipedInputStream 和 java.io.PipedOutputStream 的部分笔记,这两个类需要在两个不同的线程中同时使用来完成数据的读取和写入操作。本文演示代码段的执行环境基于JDK版本1.7。
概述
PipedInputStream和PipedOutputStream两个类需要共同使用才能完成数据的读写操作,且输入流和输出流需要在不同的线程中执行,否则容易发生死锁现象。在PipedInputStream中维护了一个缓冲区数组,PipedOutputStream的写数据操作实际上调用的是PipedInputStream的方法向缓冲区数组中写入数据,PipedInputStream中的read()方法则从缓冲区数组中读取所需要的数据。PipedInputStream中的缓冲区数组按照环形数组的设计来读取和写入,根据读取位置等于写入位置来判断缓冲区数组中是否还有未读取的数据。
继承关系
1 | // PipedInputStream |
实现接口
| 类名 | 实现接口 |
|---|---|
| PipedInputStream | Closeable, AutoCloseable |
| PipedOutputStream | Closeable, Flushable, AutoCloseable |
PipedInputStream
Constructor Summary
public PipedInputStream(PipedOutputStream src, int pipeSize)
1 | public PipedInputStream(PipedOutputStream src) throws IOException { |
参数是一个PipedOutputStream的构造函数,在初始化过程中完成了两件事情:初始化缓冲区数组容量大小和建立一个管道输入流和输出流之间的连接,最后会将输入流的connected字段标识为true。
public PipedInputStream(int pipeSize)
1 | public PipedInputStream() { |
如果是通过不依赖PipedOutputStream的方式初始化实例,那么在初始化过程中就只负责初始化缓冲区数组容量大小这一件事情了。默认大小是1024。
部分方法
private void initPipe(int pipeSize)
1 | private void initPipe(int pipeSize) { |
初始化缓冲区数组容量大小。
public void connect(PipedOutputStream src)
1 | public void connect(PipedOutputStream src) throws IOException { |
这里实际上是通过管道输出流完成连接工作的。在建立连接的过程中,把输入流的写入标志位和读取标志位都归零(in = -1,out = 0),同时将输入流的connected字段标识为true完成连接工作。
protected synchronized void receive(int b)
1 | protected synchronized void receive(int b) throws IOException { |
接收一个字节的数据,并将之保存在输入流的缓冲区数组中。第2行代码用来检查当前管道的连接状态,需要保证管道的连通性且数据读取是正常的。第3行代码会把当前执行的现成切换到写线程并获取该线程。由于管道输入流中的缓冲区数组被设计成了环形数组,所以在写入数据的下标值逐渐达到读取数据的下标值时,认为缓冲区数组已经被待读取的数据填充完全,此时缓冲区数组中无法容纳新的数据。所以第4 ~ 6行代码表示如果当前缓冲区数组中已经填满了未读取的数据,那么就唤醒读线程来读取缓冲区数组中的数据内容。第6 ~ 9行代码如果发现数据写入位置in已经被归零了,那么会将in和out都归零。第10行代码用来向缓冲区数组中写入一个byte值的数据内容。第11 ~ 13行代码则在in到达缓冲区数组尾部时回到数组首部继续存储新数据(即环形设计)。
synchronized void receive(byte b[], int off, int len)
1 | synchronized void receive(byte b[], int off, int len) throws IOException { |
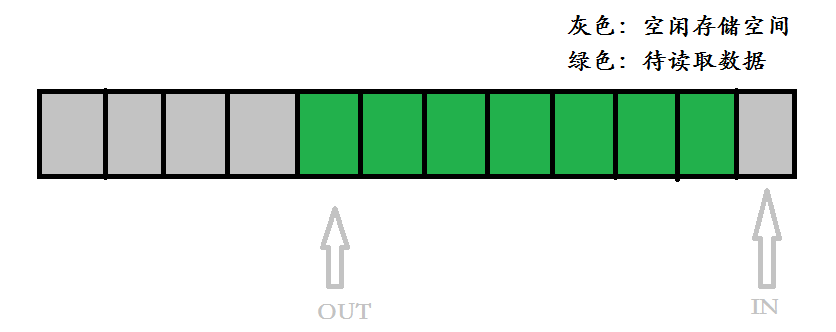
接收入参数组b的数据,并将之保存在输入流的缓冲区数组中。第2行代码用来检查当前管道的连接状态,需要保证管道的连通性且数据读取是正常的。第3行代码会把当前执行的现成切换到写线程并获取该线程。第5 ~ 29行代码则完成数据的写入操作。第6 ~ 7行代码处理缓冲区数组被写满的情况,此时会暂停写线程并切换到读线程读取缓冲区数组中的数据,之后缓冲区数组就会有新的空间来容纳新数据内容。第9 ~ 10行代码则计算图1情境中可用的可以容纳新数据的缓冲区空间大小。
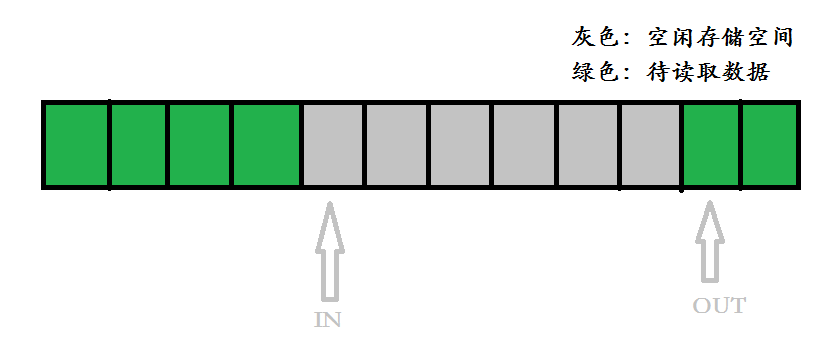
第11 ~ 18行代码则计算读取位置在写入位置前面的情境。第12 ~ 15行代码说明在之前的某一步操作中写入和读取位置都被做了归零处理,所以整个缓冲区数组都可以用来容纳新数据。第15 ~ 17行代码则计算图2情境中可以容纳新数据的缓冲区空间大小。
第19 ~ 20行代码判断当前缓冲区可用空间和入参长度的大小关系,如果可用空间大于入参长度,那么当前入参数据都可以被保存到缓冲区数组中。第22 ~ 25行代码完成数据从入参数组到缓冲区数组之间的复制和结果计算过程。如果in到达了缓冲区数组尾部,那么in会被调整到缓冲区数组头部继续写入新数据。
synchronized void receivedLast()
1 | synchronized void receivedLast() { |
数据写入完成,唤醒读线程开始读取缓冲区数组中的数据。
private void checkStateForReceive()
1 | private void checkStateForReceive() throws IOException { |
检查状态,判断当前管道是否处于连接状态、数据读取侧是否正常。
private void awaitSpace()
1 | private void awaitSpace() throws IOException { |
首先检查状态,然后唤醒所有线程。因为管道输入流和管道输出流的使用场景中大多数时候只有两个线程,一个负责写一个负责读。所以如果当前线程是读线程,那么会唤醒写线程,同时将当前(读)线程置于阻塞状态,释放资源,由写线程获得执行机会开始向缓冲区数组中写入新数据,反之亦然。
public synchronized int read()
1 | public synchronized int read() throws IOException { |
从缓冲区数组中读取一个字节的新数据。第2 ~ 10行代码用来完成管道的状态校验(管道是否连通、数据读取端是否尚未关闭、缓冲区数组中无内容时数据写入端是否开启)。第11行代码将当前执行线程切换到读线程。第12 ~ 28行代码用来在缓冲区数组中无内容时启用写线程来向缓冲区数组中写入新内容。第14 ~ 17行代码如果数据写入端被关闭了,且缓冲区数组中没有待读取的数据,那么就返回-1表示数据读取已经结束。第18 ~ 20行代码则检查写线程的状态,这里做了重复检查,重复两次得到最终判定结果。第22行代码用来唤醒写线程并准备向缓冲区数组中写入新数据。第24行代码则暂停当前读线程,使得写线程获取资源开始工作。第29行代码获取一个字节的数据并返回。第30 ~ 32行代码如果已经读到了缓冲区数组的最后一个位置,那么将out移到缓冲区数组首部继续读取新数据。第33 ~ 36行代码如果out到达了in的位置,那么缓冲区数组中已经不存在任何待读取的数据了,那么就将in和out全部归零。
public synchronized int read(byte b[], int off, int len)
1 | public synchronized int read(byte b[], int off, int len) throws IOException { |
从缓冲区数组中读出长度为len个字节的内容到数组b中。第2 ~ 8行代码用来完成入参的有效性校验,防止越界。第11 ~ 16行代码“尝试性”的从缓冲区数组中读取一个字节的内容。如果当前缓冲区数组中无内容,那么就会切换到写线程向缓冲区数组中填充新内容,如果成功的读取到了一个字节,那么就将读取到的内容保存到数组b中。第19 ~ 30行代码用来确定最终需要读取的字节数。其中,第19 ~ 26行代码用来确定缓冲区数组中剩余的未读的内容长度,而第28 ~ 30行代码则用来比较缓冲区数组中剩余的未读内容长度和调用请求的长度之间的大小关系并确定最终的需要读取的字节数。第31行代码完成数据在缓冲区数组和入参b之前的复制。第32 ~ 35行代码则维护入参需求长度len、实际读取长度rlen和缓冲区数组下一个读取位置out的值。第36 ~ 38行代码执行时,如果out已经到达缓冲区数组尾部,那么将out置于缓冲区数组头部,循环读取数据。第39 ~ 42行代码如果out已经移动到了in的位置,那么说明缓冲区数组中已经没有未读取的数据了,那么就将写入位置in重新归零。最后返回实际读取的长度rlen。
public synchronized int available()
1 | public synchronized int available() throws IOException { |
计算当前缓冲区数组中剩余的未读取的字节内容数。第2 ~ 3行代码对应图3中的场景(1),第 4 ~ 5行代码对应场景(2), 第6 ~7 行代码对应场景(3),第8 ~ 9 行代码对应场景(4)。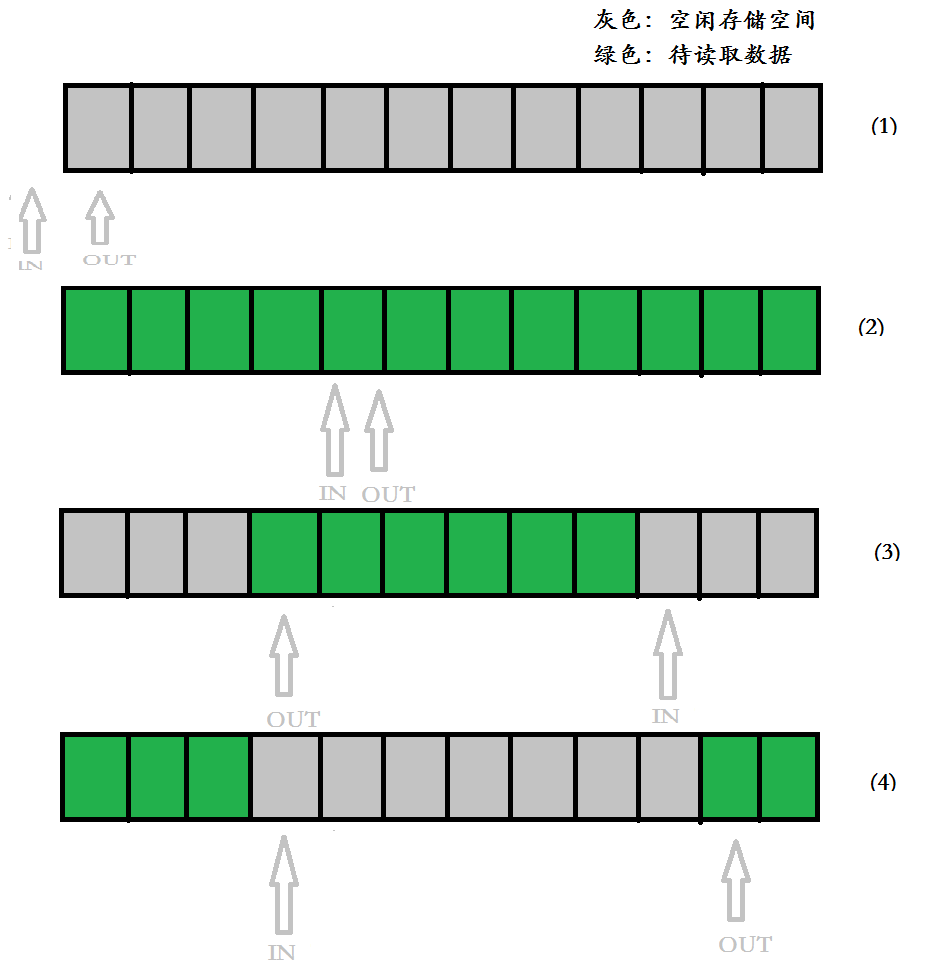
public void close()
1 | public void close() throws IOException { |
关闭当前输入流。
PipedOutputStream
Constructor Summary
public PipedOutputStream(PipedInputStream snk)
1 | public PipedOutputStream(PipedInputStream snk) throws IOException { |
初始化一个输出流并完成输入流和输出流的连接过程。在connect()方法中,会把缓冲区数组的in和out全部归零,同时将输入流标记为连接状态(connect = true)。
部分方法
public synchronized void connect(PipedInputStream snk)
1 | public synchronized void connect(PipedInputStream snk) throws IOException { |
完成输入流和输出流的连接过程。
public void write(int b)
1 | public void write(int b) throws IOException { |
向缓冲区数组中写入一个字节的数据。实际上是通过PipedInputStream的receive()方法来完成的。
public void write(byte b[], int off, int len)
1 | public void write(byte b[], int off, int len) throws IOException { |
向缓冲区数组中将入参数组b的数据写入到缓冲区数组中。在方法刚开始便对入参数组b、偏移量off和长度len等参数做了有效性校验,在校验通过后,调用PipedInputStream的receive(b, off, len)方法来完成数据的写入和保存。
public synchronized void flush()
1 | public synchronized void flush() throws IOException { |
public void close()
1 | public void close() throws IOException { |
涉及基础知识点
管道输入(出)流的典型应用场景:
1
2
3
4
5
6
7
8
9
10
11
12
13
14
15
16
17
18
19
20
21
22
23
24
25
26
27
28
29
30
31
32
33
34
35
36
37
38
39
40public static void main(String[] args) {
try {
PipedOutputStream pipedOutputStream = new PipedOutputStream();
PipedInputStream pipedInputStream = new PipedInputStream(pipedOutputStream, 1);
Thread thread1 = new Thread(new Runnable() {
public void run() {
try {
String data = "1234567asfa890";
while (true) {
pipedOutputStream.write(data.getBytes());
pipedOutputStream.flush();
}
} catch (Exception e) {
// print error logs
}
}
});
Thread thread2 = new Thread(new Runnable() {
public void run() {
try {
byte[] data = new byte[10];
while (true) {
pipedInputStream.read(data);
}
} catch (Exception e) {
// print error logs
}
}
});
thread1.start();
thread2.start();
} catch (Exception e) {
// print error logs
}
}
参考文献
- ReggieDing. PipedInputStream和PipedOutStream记录 [E]
- Asslstne. 源码分析: PipedInputStream和PipedOutputStream [E]